ciabatta, awesome
Yesterday I solved a lot of problems, and it feels really good.
A couple of weeks ago, G and I were sitting around talking about bread after another loaf didn’t come out quite perfect. I’ve been trying to make bread now for about a year and while there have been some highlights, I feel like I keep hitting a wall where nothing is coming out the way it’s supposed to. Perhaps we should have thought of this sooner, but it suddenly occurred to us that maybe it’s not the flour or the yeast, but measurements. There was an article in Cook’s Country magazine (highly recommend, by the way) recently about measuring cups, and apparently a lot of them are off by a surprising amount…one even up to a quarter cup! I also have been talking with a friend of mine who found out her oven was pretty off using an oven thermometer.
So, maybe this is why the crust isn’t always so crusty, or the texture is a little too dense…time to experiment!
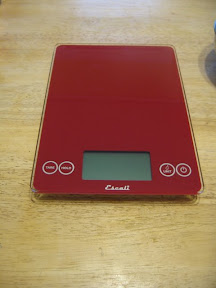
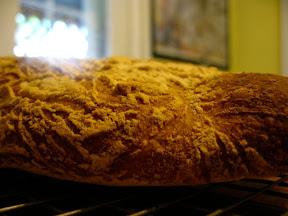
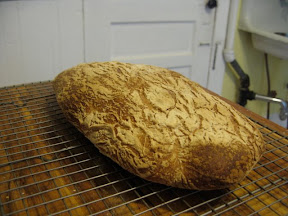
Armed with a scale (a beautiful retro red colored one!) and an oven thermometer, I followed the ciabatta recipe from The Bread Bible, an awesome bread book that gives measurements in cups, but also grams and ounces. The first thing I found out was that my oven was 50 degrees off (cooler) when it said it had preheated. Wow. I think getting it at the right temperature (after cranking it up to 520 degrees for a bit) really gave this bread a wonderful crunchy, golden brown crust. Just what I’ve been dreaming about!
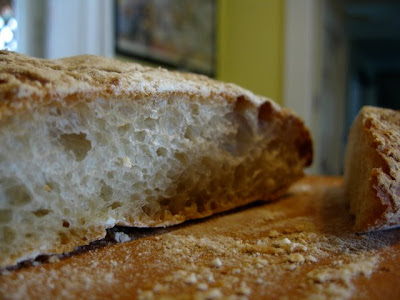
This recipe is really easy to follow, and makes crusty outside, silky chewy inside ciabatta. And the holes are gorgeous! The recipe requires a biga (an Italian dough starter) that needs to be made six hours before you bake it, sitting at room temperature. After the six hours you can bake with it, or put it in the fridge for up to three days. I made it the day before, then put it in the fridge and used it the next day, so I haven’t tested the three days. Let it warm up to room temperature before baking…same with your yeast.
Go get a scale and thermometer and try it yourself!
ciabatta
adapted from: Rose Levy Beranbaum’s The Bread Bible
ingredients
for the biga:
1/2 cup + 1/2 tablespoon OR 75 grams of unbleached all-purpose flour (I used King Arthur)
1/16 teaspoon instant yeast (ie. a little bit…how you measure this I have no idea)
1/4 cup OR 59 grams room temperature water
for the bread:
1 cup OR 136 grams unbleached all-purpose flour (again, I used King Arthur)
1/4 teaspoon instant yeast
1/2 teaspoon salt
1/2 cup water OR 118 grams
1/2 cup OR 134 grams of the biga you made (note: mine didn’t make enough, more like 122 grams, but I used it anyway)
directions
First, make the biga: Mix all of the biga ingredients in a small bowl with a spoon. Mix for about 3-5 minutes so that the biga is smooth and kind of sticky when you touch it. Cover with oiled plastic wrap (I sprayed it with Pam) and let it sit for about six hours. It should triple in size and be bubbly.
To make the bread, I used a Kitchen Aid mixer. With the whisker attachment, mix the flour and yeast to get them really combined. Mix in the salt. Then switch to the paddle attachment, and add the water and your biga.
Now, get all the flour moistened with the paddle on a low speed for a couple seconds. Switch to medium-high for 3 minutes. The dough should get pretty smooth, and then start to pull away from the sides of the bowl, making a ball under the paddle. (If after 3 minutes, it hasn’t done this, stop, scrape down the sides of the bowl with a rubber spatula, and do it on medium-high for another few minutes until it does.) Then beat for 2 minutes on medium speed.
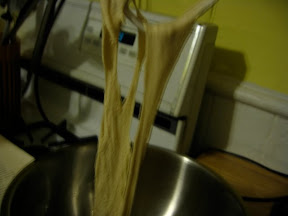
Prepare a bowl smeared with some olive oil and put the dough in it…I did this by taking out the paddle and it all clung to it in a long elasticy fashion. Pat down the dough, cover with a little more olive oil, rubbing it gently over the top with your fingers. Cover with plastic wrap and let it rise for about 2 hours.
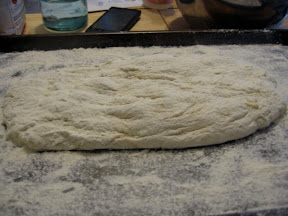
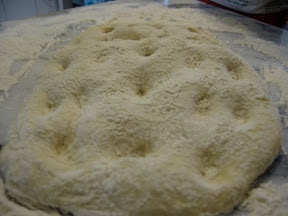
Next, prepare a baking sheet with flour sifted all over it (I learned from this that a sifter is an AWESOME way to prep a surface with flour). Also sift flour on a counter top, marble stone (thanks to my friend, E, I have a BEAUTIFUL one!), or cutting board. Remove the dough very gently from the bowl (you don’t want to mess up air pockets) and put it on the floured counter top so it’s kind of in an elongated rectangle. Push the sides together a little bit with the sides of your hands and then, using your fingers (I used my three middle ones at once, going down in a row) make pretty deep dimples in the dough. Start at the top and work your way down, with each dimple slightly tugging toward yourself. Ie you’re sticking your fingers in it and pulling back a bit to make the dough a little bit longer. Apparently this dimpling process creates the really cool groovy crust on the bread.
Now, and this was the hardest for me, you want to pick up the dough, keeping the shape, and flip it over onto the prepared baking sheet, while being as gentle as possible. I sort of jimmied a spatula underneath using one of my hands as well.
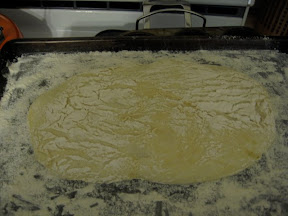
Once you’ve got it on the baking sheet, sift more flour on top, and cover very loosely with plastic wrap. Let this sit for about 1.5-2 hrs until it about 1-1.5 inches high. As soon as I set this aside, I started preheating the oven, to get it nice and hot so I would do this too, if I were you. You want to preheat it to 475 degrees. If you have a pizza stone, put that on the lowest rack. If not, put a baking sheet there, upside down. Put a cast iron pan or loaf pan or something like that on the floor of the oven under it (it needs to be something you can put ice cubes in). Now the oven is set up, so preheat it!
Once you’re ready, stick the baking sheet with bread on it (remove the plastic wrap) on the baking sheet or baking stone that has been heating up in the oven. Drop four or so ice cubes in the pan below. Bake at 475 degrees for 5 minutes, then drop it down to 450. Bake for 20 minutes (turning the baking sheet around half way through). After 20 minutes, turn off the oven and open the oven door slightly, and let the bread sit in there for 5 minutes.
Take it out, let it cool all the way on the rack, and EAT IT!


Victory! Love it, and YOU!
Interesting and awesome. Would you FedEx us a loaf?!?
I do not disagree with this article…